As a teacher at London Bike Kitchen, and doing my own bike maintenance work, one of the first things I talk to people about is how much money maintenance can save you. It’s tempting to tell people that cycling is ‘free once you buy the bike,’ but this quickly becomes untrue if you let maintenance problems build up, and let your more expensive components become unduly damaged and worn ahead of time. This is a short blog about the best ways to ruin your bike through lack of maintenance, which hopefully you’d use more in a what not to do sense. But it’s more fun to talk about it this way!
Always leave your bike outside and uncovered
Not everyone has space at home to keep a bike in, or an on-street covered storage solution like a cycle hangar. The waiting list for cycle hangars such as through Cyclehoop is very long, and unfortunately, lots of people have no choice but to lock their cycles up outside. This is especially common for someone who lives in a flat (‘apartment’) or anyone who lives on a narrowboat, where indoor storage is at a premium.

As well as being targets for theft, a bike kept outdoors is more liable to be damaged by the rain, dew, and frost. Put simply, rain will always find its way inside a bike’s bearings, washing out the grease, and making stuff wear out faster. Further, because the bike will be exposes to changes in humidity and temperature, this will exacerbate the pace at which stuff like wheel, bottom bracket, pedal and headset bearings wear out, as well as damage to the likes of the saddle and grips/bar tape, and stripping the lube off your chain. Woe unto you especially if you live around the coast, where the briny environment will play havoc on bikes and componentry left outside. Bikes kept out by the seaside are especially worth protecting by regularly cleaning them out from the inside, which is a process easier said than done, and applying a ‘frame saver’ through all the frame’s various holes (think bottle cage bolt holes, the seat tube, and the small holes left over from the manufacturing process). This is something that stainless steel, titanium and carbon fibre bikes tend to survive better against, though of course you have the rest of the bits to worry about too.
Aside from ‘just move it inside,’ in my view the best way to control damage is to cover the bike. Bicycle covers are out there, but in my view, the best value for money solution is a groundsheet with ‘market trader’ clips. You can get plastic groundsheets for about £10 and market stall clips are an inexpensive and convenient way to keep them from blown away by the wind.

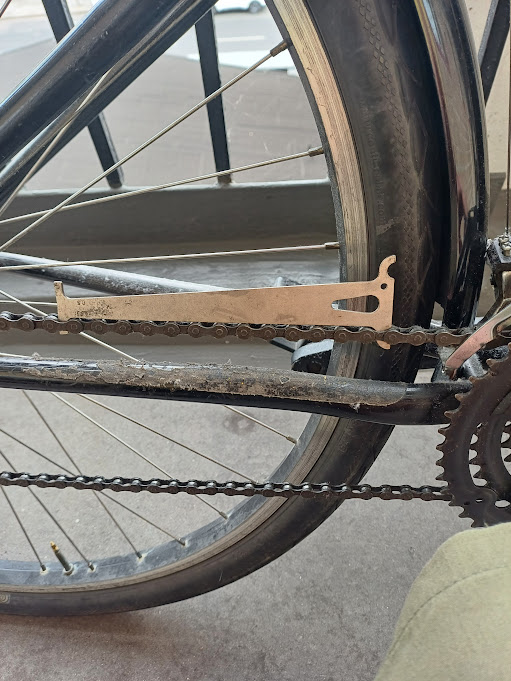
Don’t bother checking your chain for wear
When I teach at LBK I ask my tutees approximately how long they expect a bicycle chain should last before it needs replacing. In my last class, the lowest estimate was 1,000 kilometres, and the most generous guess was 10,000. What confuses matters is that when we look at a bicycle’s chain, we’re looking at it side-on, rather than top-down, and we’re not seeing the rollers, the metal doughnuts, which actually engage with the chainring and cassette/freewheel/sprocket, which over the hundreds and hundreds of miles, erode and wear away. When one cycles on a worn chain, the rollers start to gradually gouge away pieces of the chainring and the rest of the drivetrain. This makes your pedalling less efficient (ie, you’re having to work harder in order to sustain the same speeds), and can make the shifting of the gears bad. This commonly manifests as ‘skipping’ on the cassette at the back of the bike. While cleaning and lubricating your chain will slow the wear of the chain, there is no two ways about it, the chain will need replacing as it wears.
I recently met someone who said he’s had to change cassettes twice in the past year, and as the RRP of a wide 11 speed chain is in the order of £50, it’s a cost that can start to spiral.

My favourite chain wear checking tool is the Park Tool CC 3.2 checker. These cost approximately £11 new, and are easy to use. I keep mine in my on-bike toolkit so I can check other people’s when I’m out and about. Shopping online, you can generally get a replacement new bike chain for between £8 and £15, which is significantly cheaper than if you were to ride on a worn chain and have to replace the chainrings and cassette (which can come to a bill of up to £100, not including bike shop labour). For myself I’ll get a new chain when the tool is showing that the chain is 0.5% worn. Even if you aren’t going to do the chain swap yourself, and you need to go to a shop who have the tools and knowledge, knowing when it is due can save you hundreds or thousands of pounds over your life.
Spray WD40 or GT85 everywhere you hear a bad noise
I’ve never personally had much use for WD40. In case you’re not in the loop, WD40 is a water-displacing solvent which is primarily used as a cleaning agent to scour off corrosion/rust. It can also be used as a short-term lubricant, ie it is a lubricant for a few hours, and then it evaporates away. This can be useful for things like installing slide-on grips on a flat handlebar, because the WD40 lets the grips slip over the bar and into place, and the solvent evaporates off within a day so that the grips stay where they should. But isopropyl alcohol (or ‘rubbing alcohol’) can do the same thing, and it is safe to use in and around brakes. WD40, by contrast, is the ruin of brake systems, because the solvents will easily contaminate both brake pads and brake rotors, meaning that when you squeeze your levers, there’s no friction between pad and rotor, and you keep rolling along in to a crash landing. I’ll never forget the day I came to work as a cargo bike courier, and a colleague cheerfully announced that he’d cleaned up his bike with WD40, and his expression when he realised the consequences of what he’d done.

GT85 is a little bit like WD40, in that it is a spray, but instead of evaporating away to nothing, it leaves behind a hydrocarbon-based lubricating film. This can make it useful in many appliances, such as if you want to clean the threads of a set of pedals or the inside of a threaded bottom bracket – it can even be used as a chain lube, with care – but again, spraying it around with abandon can cause dire consequences. GT85 on brake pads, rotors, or rims, will ruin your brake system, so it must be employed cautiously, if at all.
If you do end up doing this, the cost of your repair bill may vary. If you’re exceptionally fortunate you may be able to ‘decontaminate’ your pads and rotors. I have achieved this by using a generous amount of isopropyl alcohol on the pads and rotors and scraping them hard with sandpaper, or even better, a ‘sanding wheel’ on an angle grinder. But if the WD40/GT85 has gone too deep into the pad’s compound, the pads are cooked, and you’ll need to buy new ones. From a real life bike shop you can expect to pay £20 for a set of pads, or possibly more, if they’re an ‘premium’ brand. A rotor should be recoverable in most cases, so long as you have the right tools to hand. But if you’re on tour and the bike shop closes in five minutes, you may have to just settle for buying new pads and rotors which can be expensive indeed.
Obviously in the bike repair and maintenance game, on some days you just have to use what you have, so if all you to clean a chain with is WD40 or GT85, or any other kind of lubricating aerosol, be sure to apply it by spraying it on to a rag a safe distance away from your bike. If you have disc brakes, consider shielding your calipers and rotors from overspray using strategically placed grocery bags and rubber bands or similar. If you’re on the road for a sustained tour (or ‘bikepacking’), a small bottle of isopropyl and a rag can go a long way to degrease your chain, coupled with a bit of chain lube, which many people report having success storing in those little fish-shaped soy sauce bottles you get in some sushi boxes in a supermarket.
Wrapping up
I hope you enjoyed reading this. I’m not perfect and have made my own share of bike mess-ups, and expect I’ll crack many more before I’m through. Hopefully this blog has given you some knowledge to take away on your own adventures, or at least given you a laugh. Have a good one!
